Chapter 3
Subsections of Ansible Playbooks
Using ansible and proxcli to provision stacks
Using ansible and proxcli to provision stack
Those are just examples of what can be done in automation with a few proxcli commands put together within a simple ansible playbook. So here we have two playbooks
- proxmox_create.yaml: allow easy creation of a number of vms and ha groups with a simple yaml description
- proxmox_destroy.yaml: allow to remove the previously created vms and ha groups.
The main use case is to easyly pop and remove labs.
Playbooks layout
This is not state of the art layout, but it just work
playbooks
├── ansible.cfg
├── proxmox_create.yml
├── proxmox_destroy.yml
└── roles
    ├── global_vars
    │   └── defaults
    │       └── main.yml
    ├── proxmox_create
    │   └── tasks
    │       └── main.yml
    └── proxmox_destroy
        └── tasks
            └── main.yml
The only file you need to modify to define a stack is playbooks/roles/global_vars/defaults/main.yml
Structure of the yaml definition file
In this file you will find three sections:
- setup: used to define the path for the proxcli utility
- provision_template: define the default values for your vm instances. All parameters can be overiden in the instance definition except for sshkey.
- provision_instances: this is where your define your project with ha groups and instances definition.
# configuration
setup:
  proxcli:
    path: /path/to/proxcli
# default vm parameters values
provision_template:
  # how many instances of the clone we need
  count: 1
  # on which node we clone the vm
  target: "pve2"
  # vmid of the template to be cloned
  clone: 100
  # don't modify this. It wait for a clone to finish before
  # doing the next one
  block: true
  full_clone: true
  # default cloud init paramaters
  user: "system"
  password: "system"
  sshkey: "~/.ssh/id_rsa.pub"
  ipconfig: "ip=dhcp"
  # default tags
  tags:
    - "qemu"
    - "lab"
  # default storage paramaters
  disk_storage: "b4papp"
  disk_device: "virtio0"
  disk_size: "30G"
  # default capacity
  cores: 2
  memory: 2048
  # clone strategy when multiple instances
  # spread allow an even deployment over
  # cluster nodes. If you have count=5 with
  # 3 cluster nodes, you will have 2 instances
  # on a nodes, another 2 instances on another
  # node and 1 instance on the last node
  strategy: "spread"
  # apply spread strategy only on this list of nodes
  nodes: pve1,pve2,pve3
# stack definitions
provision_instances:
  server-dev-01:
    ha_groups:
      server:
        nodes: pve1,pve2 # on which nodes the ha group resources apply to
        restricted: false
        nofailback: true
        max_restart: 3
        max_relocate: 3

    instances:
      server:
        desc: "application server"
        count: 3 # we want 3 instances of grafan server vms
        ha_group: "server" # belong to ha group server
        nodes: pve1,pve2,pve3 # we spread vms instances accross 3 nodes on the cluster
        tags: # tags are important for the ansible inventory creation
          - "server"
          - "lab"
          - "dev"
Creating your own stack
A stack or project is a section in the yaml file under provision_instances key. There are 2 parts in the stack definition:
- The first one ha_groups define the various ha groups.
- The second one instances define the list of desired vms instances.
you can have as many project/stack as you want under provision_instances section
provision_instances:
  project01-dev-01:
    hag_groups:
      ...
    instances:
      ...
  project01-prod-01:
    hag_groups:
      ...
    instances:
      ...
  project02-dev-01:
    hag_groups:
      ...
    instances:
      ...
Let’s say we want to deploy a grafana cluster, with a mariadb cluster for storage. We will deploy 3 instances of grafana server. To be able to load balances the three nodes, we will deploy 2 load balancers (haproxy for load balancing + keepalived for floating ip). The mariadb cluster is built on Three nodes to ensure quorum if a node fail. Here is a picture of what we want.
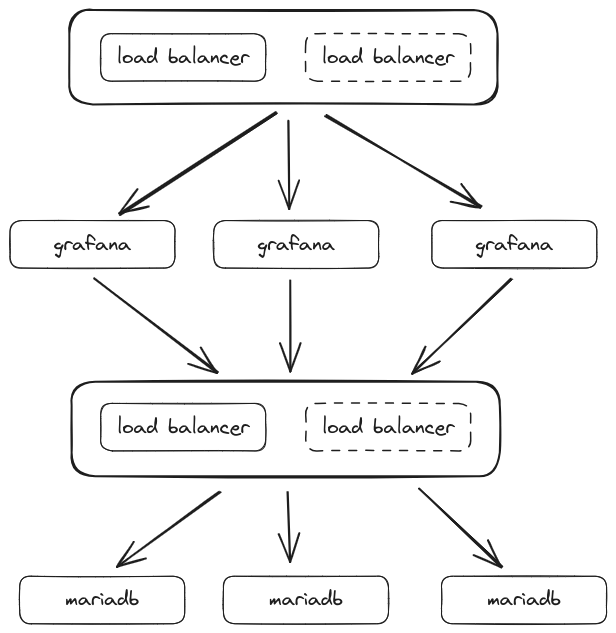
on the picture we can see a group of load balancers in front of grafana and another one in front of mariadb. Those 2 groups are on the same virtual machines with different configuration for ha proxy. The draw is just a logical view.
We add some constraints:
- All instances have 30GB disk space
- mariadb server need 4GB of ram while load balancers and grafana servers only need 2GB.
- grafana and lb have 2 cores while mariadb have 4 cores
- each component (grafana, db and lb) must have its own ha definition.
- We have 3 nodes in the proxmox cluster (pve1, pve2, pve3). pve3 have much less capacity than pve1 and pve2. We will not deploy a db instance on this node.
- we will use the same storage location for all vms (for me it is a nfs mount called b4papp)
let’s summarize this in a table:
| instance | number | hdd | memory | cores | ha_group | nodes affinity | storage location |
|---|---|---|---|---|---|---|---|
| grafana | 3 | 30G | 2G | 2 | grafana | pve1,pve2,pve3 | b4papp |
| lb | 2 | 30G | 2G | 2 | lb | pve1,pve2,pve3 | b4papp |
| db | 3 | 30G | 4G | 4 | db | pve1,pve2 | b4papp |
Time to start to write the configuration
ha_groups
we have 3 ha groups 2 of them (grafana and lb) have affinity on all 3 nodes. mariadb have affinity only on pve1 and pve2 nodes. We will name our project grafana it is a dev environment with index 01 (this is just a naming convention).
For now we will not dig into restricted, no failback, max_restart and max_relocate parameters.
provision_instances:
  grafana-dev-01:
    ha_groups:
      grafana:
        nodes: pve1,pve2,pve3
        restricted: false
        nofailback: true
        max_restart: 3
        max_relocate: 3
      lb:
        nodes: pve1,pve2,pve3
        restricted: false
        nofailback: true
        max_restart: 3
        max_relocate: 3
      db:
        nodes: pve1,pve2
        restricted: false
        nofailback: true
        max_restart: 3
        max_relocate: 3
instances
Now we have defined our ha groups. We need to define our server instances. But wait a second. grafana and lb have the same capacity for memory and cpu count. and all instances have the same capacity for HDD. We can factorize the default values in the provision_template definition (less to write later on instances definition. yeah i’m a lazy man :-)).
Note the nodes key in the template section. This is NOT the same as the one in ha_groups but it have an inpact. This key is related to the clone strategy spread. this strategy make sure that each cloned instance is evenly spreaded over those specified nodes. So if we specify 3 nodes and we want 3 instances of grafana, the strategy will make sure that each instance will be on a different node. It will TRY ! if we have 2 nodes and want 3 instances, 1 node will have 2 instances and the other one will have one instance. The impact is if you specify 3 nodes here while you want to have ha affinity on 2 specific nodes, you are not sure that the afinity is fulfilled. So in this case it is better to match nodes afinity and spread nodes. For now our template have nodes value with the list of all proxmox nodes.
provision_template:
  # our custom default values
  count: 2
  disk_size: "30G"
  target: "pve2"
  disk_storage: "b4papp"
  memory: 2048
  cores: 2
  clone: 100
  # / our custom default values
  block: true
  full_clone: true
  user: "system"
  password: "system"
  sshkey: "~/.ssh/id_rsa.pub"
  ipconfig: "ip=dhcp"
  tags:
    - "qemu"
    - "lab"
  disk_device: "virtio0"
  # default capacity
  # clone strategy when multiple instances
  # spread allow an even deployment over
  # cluster nodes. If you have count=5 with
  # 3 cluster nodes, you will have 2 instances
  # on a nodes, another 2 instances on another
  # node and 1 instance on the last node
  strategy: "spread"
  # apply spread strategy only on this list of nodes
  nodes: pve1,pve2,pve3
Let’s configure our instances. Rememenber each component can have one or more instances (for component grafana, we need 3 instances.)
    ...
    instances:
      grafana:
        desc: "grafana application"
        count: 3
        ha_group: "grafana" # belong to ha group server
        tags:
          - "grafana"
          - "grafana-server"
          - "metrics"
          - "lab"
          - "dev"
      lb:
        desc: "load balancers"
        count: 3
        ha_group: "lb"
        tags:
          - "grafana"
          - "load-balancer"
          - "keepalived"
          - "haproxy"
          - "metrics"
          - "lab"
          - "dev"
      db:
        desc: "database"
        count: 2
        nodes: pve1,pve2
        cores: 4
        memory: 4096
        ha_group: "db"
        tags:
          - "grafana"
          - "database"
          - "mariadb"
          - "metrics"
          - "lab"
          - "dev"
puting it all together
Here is the final yaml definition for our stack
setup:
  proxcli:
    path: /path/to/proxcli
provision_template:
  count: 2
  disk_size: "30G"
  target: "pve2"
  disk_storage: "b4papp"
  memory: 2048
  cores: 2
  clone: 100
  block: true
  full_clone: true
  user: "system"
  password: "system"
  sshkey: "~/.ssh/id_rsa.pub"
  ipconfig: "ip=dhcp"
  tags:
    - "qemu"
    - "lab"
  disk_device: "virtio0"
  strategy: "spread"
  nodes: pve1,pve2,pve3
provision_instances:
  grafana-dev-01:
    ha_groups:
      grafana:
        nodes: pve1,pve2,pve3
        restricted: false
        nofailback: true
        max_restart: 3
        max_relocate: 3
      lb:
        nodes: pve1,pve2,pve3
        restricted: false
        nofailback: true
        max_restart: 3
        max_relocate: 3
      db:
        nodes: pve1,pve2
        restricted: false
        nofailback: true
        max_restart: 3
        max_relocate: 3
    instances:
      grafana:
        desc: "grafana application"
        count: 3
        ha_group: "grafana"
        tags:
          - "grafana"
          - "grafana-server"
          - "metrics"
          - "lab"
          - "dev"
      lb:
        desc: "load balancers"
        count: 2
        ha_group: "lb"
        tags:
          - "grafana"
          - "load-balancer"
          - "keepalived"
          - "haproxy"
          - "metrics"
          - "lab"
          - "dev"
      db:
        desc: "database"
        count: 3
        nodes: pve1,pve2
        cores: 4
        memory: 4096
        ha_group: "db"
        tags:
          - "grafana"
          - "database"
          - "mariadb"
          - "metrics"
          - "lab"
          - "dev"
        disk_storage: "b4pstorage"
we are ready to launch the creation of our grafana cluster stack.
ansible-playbook playbooks/proxmox_create.yml --extra-vars="project=grafana-dev-01"After a few minutes …..
It can take some time until every virtual machine is fully available. Next you can genrate an ansible inventory.
proxcli inventory save --filter-name "^grafana-dev-01" --output-format yaml --path ./grafana-dev-01.inventory.yamlyou can the test virtual machines availability
ansible -u system -i grafana-dev-01.inventory.yaml -m ping allBonus
we can shorten stack creation and destroy commands using two simple functions. You just have to your .bashrc file and reopen your terminal session or just source the .bashrc file. Add the following lines at the end of your .bashrc file:
pdestroy() { ~/Documents/proxcli/venv/bin/ansible-playbook ~/Documents/proxcli/playbooks/proxmox_destroy.yml --extra-vars="project=$1";}
pcreate() { ~/Documents/proxcli/venv/bin/ansible-playbook ~/Documents/proxcli/playbooks/proxmox_create.yml --extra-vars="project=$1";}
Take care to adapt the path to your proxcli virtual environment installation folder and playbook path.
This way it is easy to call stack creation and destruction.
pcreate grafana-dev-01
pdestroy grafana-dev-01
Provision K3S cluster
Configure proxcli playbooks to provision cluster
Edit the playbooks/blobal_vars/defaults/main.yml file and add the following to the provision_instances section:
  k3s-dev-01:
    ha_groups:
      master:
      node:
    instances:
      master:
        desc: "control plane"
        count: 3
        ha_group: "master"
        memory: 4096
        cores: 4
        disk_storage: "b4pstorage"
        tags:
          - "k3s"
          - "master"
          - "k3s_cluster"
      node:
        desc: "node"
        count: 4
        ha_group: "node"
        memory: 4096
        cores: 4
        disk_storage: "b4papp"
        tags:
          - "k3s"
          - "node"
          - "k3s_cluster"
Launch cluster provisionning
pcreate k3s-dev-01After a few minutes you will have the vm spreaded over your nodes and available.
Deploy the k3s cluster
We will use the following playbook provided on k3s.io github repositories: https://github.com/k3s-io/k3s-ansible
git clone https://github.com/k3s-io/k3s-ansible
cd k3s-ansible
cp -a inventory/sample inventory/k3s-dev-01
proxcli inventory save --filter-name "^k3s-dev-01" --output-format yaml --path ./inventory/k3s-dev-01/inventory.yaml
ansible-playbook -i inventory/k3s-dev-01/inventory.yaml --extra-vars="ansible_user=system" site.yml