PROXCLI
proxcli is a remote proxmox administration tool. proxcli is written in python3 and use the following opensources project:
Feel free to contribute with suggestion, documentation or code. David GUENAULT (david dot guenault at gmail dot com)

proxcli is a remote proxmox administration tool. proxcli is written in python3 and use the following opensources project:
Feel free to contribute with suggestion, documentation or code. David GUENAULT (david dot guenault at gmail dot com)
Proxcli is written in python. We must first create a virtual environment with the following commands.
mkdir proxcli
cd proxcli
python3 -m venv venv
source venv/bin/activate
pip install --upgrade pip wheelYou can choose a proxcli version from one released on the github repo (here 0.1.0-alpha.5).
pip install https://github.com/david-guenault/proxcli/archive/refs/tags/0.1.0-alpha.5.tar.gzYou know have to initialize the proxcli configuration file. You only need three parameters:
proxcli config create --hosts "proxmox1,proxmox2,proxmox3" --user "root@pam" --password "*********"You can test the installation by listing the existing virtual machines on your cluster
proxcli --help


| option | description | Allowed values |
|---|---|---|
| hosts | coma separated list of proxmox nodes ip addresses / host names | string |
| user | administrator username (only pam at the moment) | string |
| password | password | string |
proxcli config create --hosts "pve1,pve2,pve3" --user root@pam --password rootpassword
|option|description|Allowed values|
proxcli config show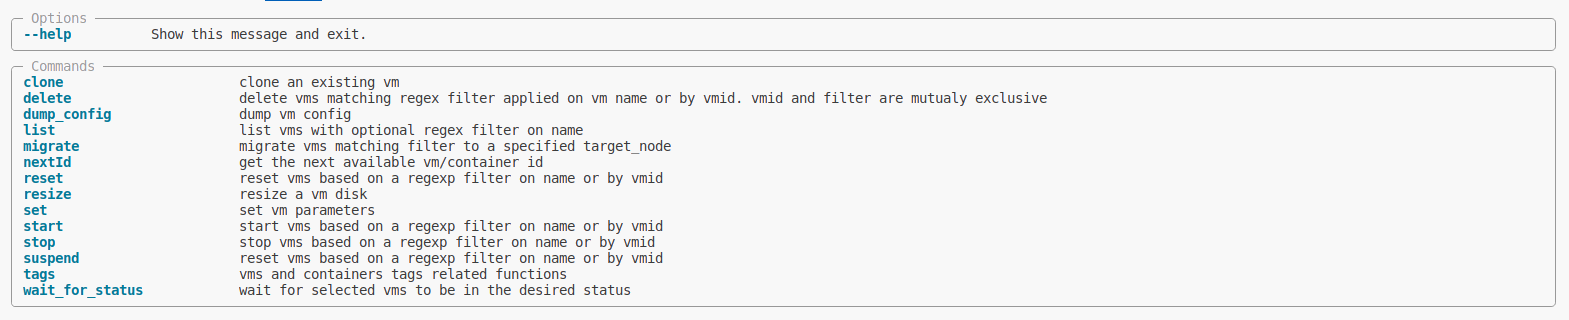 !
!

| option | description | Allowed values |
|---|---|---|
| filter-name | apply a regex filter on virtual machines name | regex string |
| output-format | output the result of the list command in the selected format (default to table) | table or yaml or json |
| proxmox-node | coma separated list of proxmox nodes where we will search for virtual machines | node1,node2,node3 |
| status | virtual machine status | running or stopped |
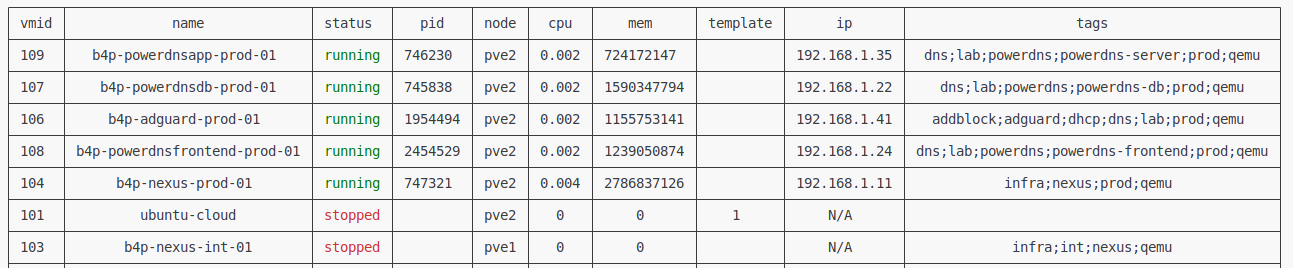
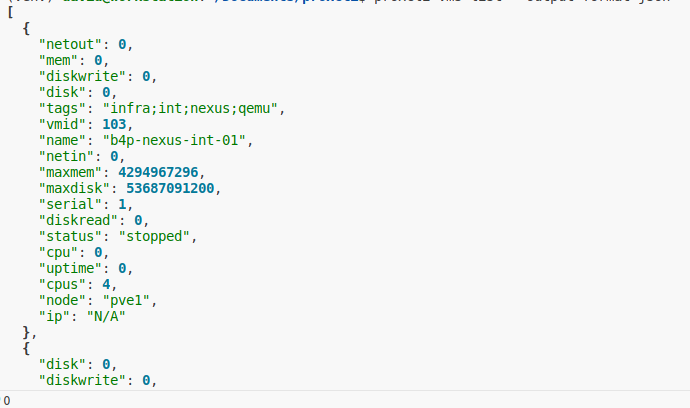
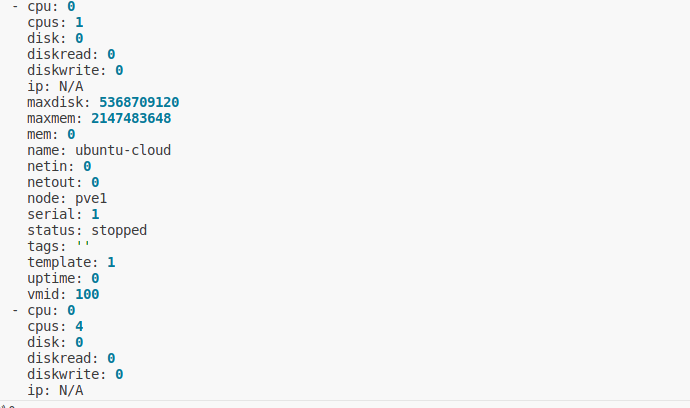
proxcli vms listproxcli vms list --proxmox-nodes pve1,pve2proxcli vms list --filter-name "^b4p-"proxcli vms list --status runningproxcli vms list --status running --proxmox-node pve2 --filter-name ".*powerdns.*"In the previous exemples, the result is formated as a nice table. you can specify other output formating such as json or yaml. just add the output-format argument. This argument take one of table, yaml or json value.
| table | json | yaml |
|---|---|---|
| 
| 
|

| option | description | Allowed values |
|---|---|---|
| vmid | virtual machine template id to be cloned | integer |
| name | virtual machine clone name | regex string |
| vm-description | virtual machine clone description | string |
| full-clone | A full clone VM is a complete copy and is fully independant to the original VM or VM Template, but requires the same disk space as the original. | N/A |
| storage | storage name (local or remote) where the virtual machine disk image will be cloned | string |
| target | the target proxmox node name where the cloned virtual machine will be assigned | string |
| block | will the clone process will block until it end ? It make sense on slow remote storage (like on NAS), we wait for the clone task to finish before doing the next clone. This prevent IO saturation on storage | N/A |
| duplicate | how many duplicate do we need ? each duplicate will get his name suffixed by an index. | integer |
vmid and name are mutualy exclusive
proxcli vms clone --vmid 111 --name test --vm-description test --full-clone --block --target pve2 --storage b4papp This is the same command as for a normal clone but you need additional steps to set user, password, ssh public key and network configuration. Try the following commands after cloning finishes.
proxcli vms set --vmid 112 --ciuser myuser --cipassword mypassword --ipconfig "ip=dhcp" --sshkey "$(cat ~/.ssh/id_rsa.pub)"
proxcli vms set --vmid 112 --cores 4 --memory 4096
proxcli vms resize --vmid 112 --disk virtio0 --size "50G"Make sure you already have a cloud init enabled template on your proxmox nodes. You can find in the next section an example of creating an ubuntu server cloud init enabled image.
you will need virt-customize tool on your proxmox nodes in order to install qemu-guest-agent (install it with apt install libguestfs-tools) you also need an ubuntu cloud-init enabled image. You can find one here
virt-customize -a lunar-server-cloudimg-amd64.img --install qemu-guest-agent
virt-customize -a lunar-server-cloudimg-amd64.img --run-command "echo -n > /etc/machine-id"Those commands will help you create an ubuntu cloud init enabled virtual machine template. Adjust the variables at the begining of the script so it match your needs.
vmid=$(pvesh get /cluster/nextid)
isopath="/mnt/pve/isos/template/iso/lunar-server-cloudimg-amd64.img"
templatename="lunar-server-cloudinit"
memory=2048
storage="b4papp"
scsihw="virtio-scsi-pci"
devname="virtio"
disksize="5G"
qm create $vmid  --memory ${memory} --name ${templatename} --net0 virtio,bridge=vmbr0
qm set $vmid --agent enabled=1
qm importdisk $vmid $isopath $storage
qm set $vmid --scsihw $scsihw --${devname}0 ${storage}:${vmid}/vm-${vmid}-disk-0.raw
qm set $vmid --ide2 ${storage}:cloudinit
qm set $vmid --boot c --bootdisk ${devname}0
qm resize $vmid ${devname}0 ${disksize}
qm set ${vmid} --serial0 socket --vga serial0
qm template ${vmid}On some shared storages (like Synology NFS share), you may encounter the following error with qm template command:
/usr/bin/chattr: Operation not supported while reading flags on /mnt/pve/b4papp/images/111/base-111-disk-0.rawYou don’t have to do anything, it is just a limitation in synology hardening. But it does not affect the creation of a template.

| option | description | Allowed values |
|---|---|---|
| vmid | The (unique) ID of the VM. | integer |
| vmname | Virtual Machine exact name | string |
| cores | The number of cores per socket. | integer |
| sockets | The number of CPU sockets. | integer |
| cpulimit | Limit of CPU usage. NOTE: If the computer has 2 CPUs, it has total of ‘2’ CPU time. Value ‘0’ indicates no CPU limit. | integer |
| memory | Amount of RAM for the VM in MiB. This is the maximum available memory when you use the balloon device. | integer |
| ipconfig | cloud-init: Specify IP addresses and gateways for the corresponding interface. IP addresses use CIDR notation, gateways are optional but need an IP of the same type specified. The special string ‘dhcp’ can be used for IP addresses to use DHCP, in which case no explicit gateway should be provided. For IPv6 the special string ‘auto’ can be used to use stateless autoconfiguration. This requires cloud-init 19.4 or newer. If cloud-init is enabled and neither an IPv4 nor an IPv6 address is specified, it defaults to using dhcp on IPv4. | string |
| cipassword | cloud-init: Password to assign the user. Using this is generally not recommended. Use ssh keys instead. Also note that older cloud-init versions do not support hashed passwords. | string |
| ciuser | cloud-init: User name to change ssh keys and password for instead of the image’s configured default user. | string |
| citype | Specifies the cloud-init configuration format. The default depends on the configured operating system type ostype. We use the nocloud format for Linux, and configdrive2 for windows. | string |
| boot | Specify guest boot order. Use the ‘order=’ sub-property as usage with no key or ’legacy=’ is deprecated. | string |
| sshkey | cloud-init: Setup public SSH key | string |
Set parameters is a small subset of what is available in the proxmox API. I (maybe) will had more parameters later.
assert we have already cloned a cloud init enabled ubuntu virtual machine with the following command:
proxcli vms clone --vmid 100 --full-clone --block --name ubuntu-cloud-init-clone --vm-description exemple_clone --target pve1 --storage b4pappthe cloned vm is not started yet
proxcli vms set --vmid 110 --ciuser myuser --cipassword mypassword --ipconfig "ip=dhcp" --sshkey "$(cat ~/.ssh/id_rsa.pub)"proxcli vms set --vmid 110 --cores 4 --memory 4096proxcli vms start --vmid 111
| option | description | Allowed values |
|---|---|---|
| vmid | the virtual machine id from which you want to resize the disk | string |
| vmname | the virtual machine name from which you want to resize the disk | string |
| filter-name | regex selector applied on virtual machines names you want to resize the disk | string |
| disk | the disk name in virtual machine config (usualy the one associated with bootdisk) | string |
| size | The desired size of the disk (Ex: 50G) | string |
vmid, vmname and filter-name are mutualy exclusive
proxcli vms resize --vmid 111 --disk virtio0 --size "60G"
| option | description | Allowed values |
|---|---|---|
| vmid | the virtual machine id you want to delete | string |
| filter-name | a regex applied on virtual machine name | string |
| confirm | does not ask for confirmation | N/A |
| block | block the command until it finished | N/A |
proxcli vms delete --vmid 111proxcli vms delete --filter-name "^b4p"proxcli vms delete --filter-name "^b4p" --confirm --block
| argument | description | Allowed values |
|---|---|---|
| vmid | virtual machine from which we want to dump the config | integer |
proxcli vms dump_config 111
| option | description | Allowed values |
|---|---|---|
| vmid | The virtual machine id to migrate | integer |
| filter-name | A regex string to select multiple virtual machines to be migrated | string regex |
| target-node | the proxmox target node name | string |
vmid and filter-name are mutualy exclusive
You can’t migrate a running virtual machine. The only way to do live migration is through cluster ha resource migrate. See cluster ha section
proxcli vms migrate --vmid 111 --target-node pve2 proxcli vms migrate --filter-name "^b4p" --target-node pve2| option | description | Allowed values |
|---|
proxcli vms nextId

| option | description | Allowed values |
|---|
proxcli vms tags list
| option | description | Allowed values |
|---|---|---|
| vm-tags | coma separated list of tags | string |
| filter-name | regex applied to match virtual machine names | string |
| set-mode | whether we can append or replace tags. default to replace | string |
proxcli vms tags set --vm-tags "template,ubuntu" --filter-name "^ubuntu-cloud"proxcli vms tags set --vm-tags "newtag" --filter-name "^ubuntu-cloud" --set-mode appendVirtual machine status commands use the same options interface for every desired status. The following options table apply to all status commands such as start, stop, suspend or reset.
| option | description | Allowed values |
|---|---|---|
| vmid | the virtual machine id you want to delete | string |
| filter-name | a regex applied on virtual machine name | string |
proxcli vms start --vmid 101proxcli vms stop --vmid 101proxcli vms suspend --filter-name "^b4p"proxcli vms reset --vmid 101
wait for virtual machines to reach the desired status (stopped, running …)
| option | description | Allowed values |
|---|---|---|
| vmid | the virtual machine id you want to wait for reaching the desired status | string |
| name | the virtual machine name you want to wait for reaching the desired status | string |
| filter-name | a regex applied on virtual machine name you want to wait for reaching the desired status | string |
| status | the desired status | string |
vmid, name and filter-name are mutualy exclusive
proxcli vms wait_for_status --filter-name "^test" --status "stopped"

| option | description | Allowed values |
|---|---|---|
| output-format | format the output to one of table, json or yaml | string |
proxcli cluster status
| option | description | Allowed values |
|---|---|---|
| output-format | format the output to one of table, json or yaml | string |
| max-items | max number of log lines we grab from nodes | integer |
| proxmox-nodes | comma separated list of nodes issuing the log lines | string |
| severities | filter logs by severities. this option is a coma separated list of severities labels (panic,alert,critical,error,warning,notice,info,debug) | string |
proxcli cluster logproxcli cluster log --severities critical,error,warning --max-items 1000
High Availability ensures that a VM will stay running even if an individual node is shut down. This means that if the device is either powered off or has any sort of issue, the VM will automatically migrate to another node and start there. This will use all nodes to ensure the VMs configured will stay running as close to 100% of the time as possible.
source: https://www.wundertech.net/how-to-set-up-a-cluster-in-proxmox/
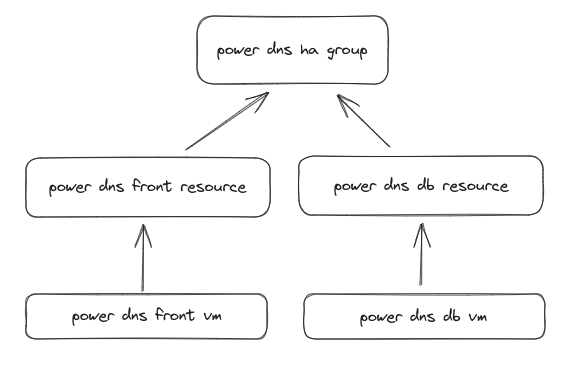
Virtual machine HA in proxmox depend on two concepts:
An HA group is a logical configuration specifying on which nodes the vm can be migrated when a proxmox node fail. HA resouces is a virtual machine associated with an HA group. Several resources can be created and associated with a group.


| option | description | Allowed values |
|---|
proxcli cluster ha groups list
| option | description | Allowed values |
|---|---|---|
| group | Cluster ha group name to be created | string |
| proxmox-nodes | On which proxmox nodes the group should apply | string |
| restricted | The CRM tries to run services on the node with the highest priority. If a node with higher priority comes online, the CRM migrates the service to that node. Enabling nofailback prevents that behavior. | N/A |
| nofailback | Resources bound to restricted groups may only run on nodes defined by the group. The resource will be placed in the stopped state if no group node member is online. Resources on unrestricted groups may run on any cluster node if all group members are offline, but they will migrate back as soon as a group member comes online. One can implement a preferred node behavior using an unrestricted group with only one member. | N/A |
proxcli cluster ha groups create --group powerdns --nofailback --proxmox-nodes "pve1,pve2"
| option | description | Allowed values |
|---|---|---|
| group | Cluster ha group name to be deleted | string |
It is impossible to delete a group with associated resources. You must first delete resources from group and then delete the group
proxcli cluster ha groups delete --group powerdns
| option | description | Allowed values |
|---|
proxcli cluster ha resources list
| option | description | Allowed values |
|---|---|---|
| group | the cluster ha group this resource belong to | string |
| vmid | the virtual machine id you want to assign to the resource | string |
| name | the cluster ha resource name | string |
| comment | additional information for this resource | N/A |
| state | Requested resource state. The CRM reads this state and acts accordingly. Please note that enabled is just an alias for started. (disabled | enabled |
| max-relocate | Maximal number of service relocate tries when a service failes to start | integrer |
| max-restart | Maximal number of tries to restart the service on a node after its start failed. | integer |
proxcli cluster ha resources add --group gitlab --vmid 105
| option | description | Allowed values |
|---|---|---|
| vmid | the virtual machine id you want to remove from resources | string |
| filter-name | A regex applied on virtual machine name used to select matching virtual machines to remove from resources | string |
proxcli cluster ha resources delete --vmid 105proxcli cluster ha resources delete --filter-name "^.*$"
| option | description | Allowed values |
|---|---|---|
| vmid | The virtual machine id to migrate | integer |
| filter-name | a regex on virtual machines name used to select multiples virtual machines to be migrated | string |
| proxmox-node | the target node to migrate the virtual machines to | string |
| block | wait for each resources to finish migration before starting another one (sequential mode) | string |
vmid and filter-name are mutualy exclusive
proxcli cluster ha resources migrate --vmid 125 --proxmox-node pve1proxcli cluster ha resources migrate --filter-name "^b4p-powerdns" --proxmox-node pve1proxcli cluster ha resources migrate --filter-name "^b4p-powerdns" --proxmox-node pve1 --block
| option | description | Allowed values |
|---|---|---|
| vmid | The virtual machine id to be relocated | integer |
| filter-name | a regex on virtual machines name used to select multiples virtual machines to be relocated | string |
| proxmox-node | the target node to relocate the virtual machines to | string |
| block | wait for each resources to finish relocation before starting another one (sequential mode) | string |
vmid and filter-name are mutualy exclusive
proxcli cluster ha resources relocate --vmid 125 --proxmox-node pve1proxcli cluster ha resources relocate --filter-name "^b4p-powerdns" --proxmox-node pve1proxcli cluster ha resources relocate --filter-name "^b4p-powerdns" --proxmox-node pve1 --block

| option | description | Allowed values |
|---|---|---|
| filter-name | apply a regex filter on nodes names | string |
| output-format | one of table, json or yaml. Default to table | string |
proxcli nodes list

| option | description | Allowed values |
|---|---|---|
| proxmox-nodes | coma separated list of proxmox nodes from which we want to grab networks | string |
| output-format | format to display networks list (json, yaml or table) | string |
proxcli nodes nodes networks list --proxmox-nodes "pve1,pve2"

| option | description | Allowed values |
|---|
proxcli cluster storages list
| option | description | Allowed values |
|---|---|---|
| file | the path to the local filename to be upload | string |
| storage | the configured storage name in proxmox node | string |
| proxmox-node | proxmox node name | string |
| content | the file content type (iso or images) | string |


| option | description | Allowed values |
|---|---|---|
| storage | the node storage name (local-lvm, isos, …) | string |
| proxmox-node | proxmox node name | string |
| output-format | output format can be one of table, json, yaml (default to table) | string |
| content-type | filter by content column (iso, tzst, raw, qcow2 ….) | string |
| content-format | filter by content format. Can be one of iso,images,backup,vztmpl | string |
| filter-orphaned | can be YES (orphaned content), NO (no orphaned content), N/A (not applicable to orphaned content). This is a coma separated list. Default to YES,NO,N/A | string |
proxcli nodes storages content list --node pve1 --storage local-lvmproxcli nodes storages content list --node pve1 --storage b4papp --content-type raw --content-format images
| option | description | Allowed values |
|---|---|---|
| storage | the node storage name (local-lvm, isos, …) | string |
| proxmox-node | proxmox node name | string |
| output-format | output format can be one of table, json, yaml (default to table) | string |
| content-type | filter by content column (iso, tzst, raw, qcow2 ….) | string |
| content-format | filter by content format. Can be one of iso,images,backup,vztmpl | string |
| filter-orphaned | can be YES (orphaned content), NO (no orphaned content), N/A (not applicable to orphaned content). This is a coma separated list. Default to YES,NO,N/A | string |
proxcli nodes storages content list --node pve1 --storage local-lvmproxcli nodes storages content list --node pve1 --storage b4papp --content-type raw --content-format images 
| option | description | Allowed values |
|---|---|---|
| proxmox-nodes | coma separated list of proxmox nodes from which we want to grab tasks | string |
proxcli nodes tasks --proxmox-nodes "pve1,pve2"

| option | description | Allowed values |
|---|---|---|
| filter-name | filter inventory by a regex applyed on virtual machines names | string |
| exclude-tag | exclude tags from inventory. Comma separated list of tags | string |
| output-format | output format is one of (json, yaml) | string |
proxcli inventory showproxcli inventory show --filter-name "^test"proxcli inventory show --filter-name "^test" --exclude-tag "production"
| option | description | Allowed values |
|---|---|---|
| exclude-tags | a list of coma separated tags to be excluded from the ansible inventory file | string |
| filter-name | a regex applied on host names so only matching host names will be saved in the ansible inventory file | string |
| output-format | one of json or yaml | string |
| path | full path of the ansible inventory file | string |
proxcli inventory create --path ./inventory.yamlproxcli inventory create --path ./inventory.yaml --filter-name "^test"Those are just examples of what can be done in automation with a few proxcli commands put together within a simple ansible playbook. So here we have two playbooks
The main use case is to easyly pop and remove labs.
This is not state of the art layout, but it just work
playbooks
├── ansible.cfg
├── proxmox_create.yml
├── proxmox_destroy.yml
└── roles
    ├── global_vars
    │   └── defaults
    │       └── main.yml
    ├── proxmox_create
    │   └── tasks
    │       └── main.yml
    └── proxmox_destroy
        └── tasks
            └── main.yml
The only file you need to modify to define a stack is playbooks/roles/global_vars/defaults/main.yml
In this file you will find three sections:
# configuration
setup:
  proxcli:
    path: /path/to/proxcli
# default vm parameters values
provision_template:
  # how many instances of the clone we need
  count: 1
  # on which node we clone the vm
  target: "pve2"
  # vmid of the template to be cloned
  clone: 100
  # don't modify this. It wait for a clone to finish before
  # doing the next one
  block: true
  full_clone: true
  # default cloud init paramaters
  user: "system"
  password: "system"
  sshkey: "~/.ssh/id_rsa.pub"
  ipconfig: "ip=dhcp"
  # default tags
  tags:
    - "qemu"
    - "lab"
  # default storage paramaters
  disk_storage: "b4papp"
  disk_device: "virtio0"
  disk_size: "30G"
  # default capacity
  cores: 2
  memory: 2048
  # clone strategy when multiple instances
  # spread allow an even deployment over
  # cluster nodes. If you have count=5 with
  # 3 cluster nodes, you will have 2 instances
  # on a nodes, another 2 instances on another
  # node and 1 instance on the last node
  strategy: "spread"
  # apply spread strategy only on this list of nodes
  nodes: pve1,pve2,pve3
# stack definitions
provision_instances:
  server-dev-01:
    ha_groups:
      server:
        nodes: pve1,pve2 # on which nodes the ha group resources apply to
        restricted: false
        nofailback: true
        max_restart: 3
        max_relocate: 3

    instances:
      server:
        desc: "application server"
        count: 3 # we want 3 instances of grafan server vms
        ha_group: "server" # belong to ha group server
        nodes: pve1,pve2,pve3 # we spread vms instances accross 3 nodes on the cluster
        tags: # tags are important for the ansible inventory creation
          - "server"
          - "lab"
- "dev"A stack or project is a section in the yaml file under provision_instances key. There are 2 parts in the stack definition:
you can have as many project/stack as you want under provision_instances section
provision_instances:
  project01-dev-01:
    hag_groups:
      ...
    instances:
      ...
  project01-prod-01:
    hag_groups:
      ...
    instances:
      ...
  project02-dev-01:
    hag_groups:
      ...
    instances:
      ...
Let’s say we want to deploy a grafana cluster, with a mariadb cluster for storage. We will deploy 3 instances of grafana server. To be able to load balances the three nodes, we will deploy 2 load balancers (haproxy for load balancing + keepalived for floating ip). The mariadb cluster is built on Three nodes to ensure quorum if a node fail. Here is a picture of what we want.
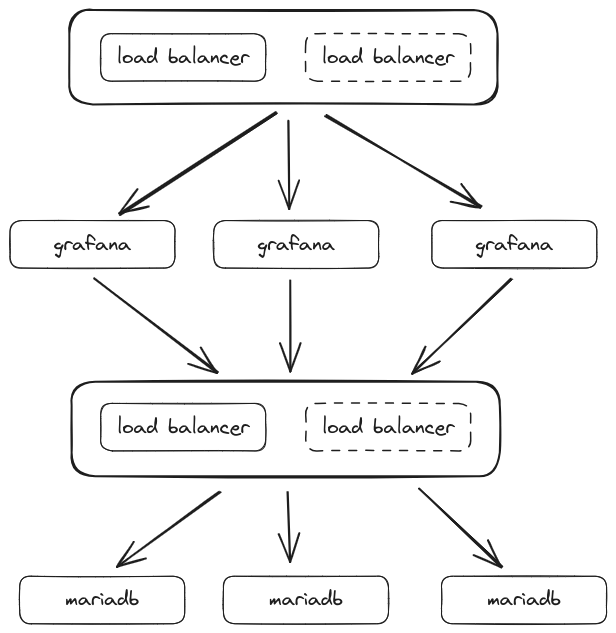
on the picture we can see a group of load balancers in front of grafana and another one in front of mariadb. Those 2 groups are on the same virtual machines with different configuration for ha proxy. The draw is just a logical view.
We add some constraints:
let’s summarize this in a table:
| instance | number | hdd | memory | cores | ha_group | nodes affinity | storage location |
|---|---|---|---|---|---|---|---|
| grafana | 3 | 30G | 2G | 2 | grafana | pve1,pve2,pve3 | b4papp |
| lb | 2 | 30G | 2G | 2 | lb | pve1,pve2,pve3 | b4papp |
| db | 3 | 30G | 4G | 4 | db | pve1,pve2 | b4papp |
Time to start to write the configuration
we have 3 ha groups 2 of them (grafana and lb) have affinity on all 3 nodes. mariadb have affinity only on pve1 and pve2 nodes. We will name our project grafana it is a dev environment with index 01 (this is just a naming convention).
For now we will not dig into restricted, no failback, max_restart and max_relocate parameters.
provision_instances:
  grafana-dev-01:
    ha_groups:
      grafana:
        nodes: pve1,pve2,pve3
        restricted: false
        nofailback: true
        max_restart: 3
        max_relocate: 3
      lb:
        nodes: pve1,pve2,pve3
        restricted: false
        nofailback: true
        max_restart: 3
        max_relocate: 3
      db:
        nodes: pve1,pve2
        restricted: false
        nofailback: true
        max_restart: 3
max_relocate: 3Now we have defined our ha groups. We need to define our server instances. But wait a second. grafana and lb have the same capacity for memory and cpu count. and all instances have the same capacity for HDD. We can factorize the default values in the provision_template definition (less to write later on instances definition. yeah i’m a lazy man :-)).
Note the nodes key in the template section. This is NOT the same as the one in ha_groups but it have an inpact. This key is related to the clone strategy spread. this strategy make sure that each cloned instance is evenly spreaded over those specified nodes. So if we specify 3 nodes and we want 3 instances of grafana, the strategy will make sure that each instance will be on a different node. It will TRY ! if we have 2 nodes and want 3 instances, 1 node will have 2 instances and the other one will have one instance. The impact is if you specify 3 nodes here while you want to have ha affinity on 2 specific nodes, you are not sure that the afinity is fulfilled. So in this case it is better to match nodes afinity and spread nodes. For now our template have nodes value with the list of all proxmox nodes.
provision_template:
  # our custom default values
  count: 2
  disk_size: "30G"
  target: "pve2"
  disk_storage: "b4papp"
  memory: 2048
  cores: 2
  clone: 100
  # / our custom default values
  block: true
  full_clone: true
  user: "system"
  password: "system"
  sshkey: "~/.ssh/id_rsa.pub"
  ipconfig: "ip=dhcp"
  tags:
    - "qemu"
    - "lab"
  disk_device: "virtio0"
  # default capacity
  # clone strategy when multiple instances
  # spread allow an even deployment over
  # cluster nodes. If you have count=5 with
  # 3 cluster nodes, you will have 2 instances
  # on a nodes, another 2 instances on another
  # node and 1 instance on the last node
  strategy: "spread"
  # apply spread strategy only on this list of nodes
  nodes: pve1,pve2,pve3
Let’s configure our instances. Rememenber each component can have one or more instances (for component grafana, we need 3 instances.)
    ...
    instances:
      grafana:
        desc: "grafana application"
        count: 3
        ha_group: "grafana" # belong to ha group server
        tags:
          - "grafana"
          - "grafana-server"
          - "metrics"
          - "lab"
          - "dev"
      lb:
        desc: "load balancers"
        count: 3
        ha_group: "lb"
        tags:
          - "grafana"
          - "load-balancer"
          - "keepalived"
          - "haproxy"
          - "metrics"
          - "lab"
          - "dev"
      db:
        desc: "database"
        count: 2
        nodes: pve1,pve2
        cores: 4
        memory: 4096
        ha_group: "db"
        tags:
          - "grafana"
          - "database"
          - "mariadb"
          - "metrics"
          - "lab"
- "dev"Here is the final yaml definition for our stack
setup:
  proxcli:
    path: /path/to/proxcli
provision_template:
  count: 2
  disk_size: "30G"
  target: "pve2"
  disk_storage: "b4papp"
  memory: 2048
  cores: 2
  clone: 100
  block: true
  full_clone: true
  user: "system"
  password: "system"
  sshkey: "~/.ssh/id_rsa.pub"
  ipconfig: "ip=dhcp"
  tags:
    - "qemu"
    - "lab"
  disk_device: "virtio0"
  strategy: "spread"
  nodes: pve1,pve2,pve3
provision_instances:
  grafana-dev-01:
    ha_groups:
      grafana:
        nodes: pve1,pve2,pve3
        restricted: false
        nofailback: true
        max_restart: 3
        max_relocate: 3
      lb:
        nodes: pve1,pve2,pve3
        restricted: false
        nofailback: true
        max_restart: 3
        max_relocate: 3
      db:
        nodes: pve1,pve2
        restricted: false
        nofailback: true
        max_restart: 3
        max_relocate: 3
    instances:
      grafana:
        desc: "grafana application"
        count: 3
        ha_group: "grafana"
        tags:
          - "grafana"
          - "grafana-server"
          - "metrics"
          - "lab"
          - "dev"
      lb:
        desc: "load balancers"
        count: 2
        ha_group: "lb"
        tags:
          - "grafana"
          - "load-balancer"
          - "keepalived"
          - "haproxy"
          - "metrics"
          - "lab"
          - "dev"
      db:
        desc: "database"
        count: 3
        nodes: pve1,pve2
        cores: 4
        memory: 4096
        ha_group: "db"
        tags:
          - "grafana"
          - "database"
          - "mariadb"
          - "metrics"
          - "lab"
          - "dev"
        disk_storage: "b4pstorage"
we are ready to launch the creation of our grafana cluster stack.
ansible-playbook playbooks/proxmox_create.yml --extra-vars="project=grafana-dev-01"After a few minutes …..
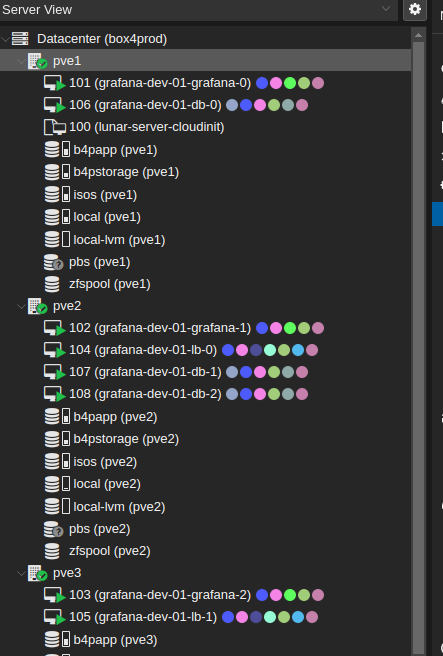
It can take some time until every virtual machine is fully available. Next you can genrate an ansible inventory.
proxcli inventory save --filter-name "^grafana-dev-01" --output-format yaml --path ./grafana-dev-01.inventory.yamlyou can the test virtual machines availability
ansible -u system -i grafana-dev-01.inventory.yaml -m ping allwe can shorten stack creation and destroy commands using two simple functions. You just have to your .bashrc file and reopen your terminal session or just source the .bashrc file. Add the following lines at the end of your .bashrc file:
pdestroy() { ~/Documents/proxcli/venv/bin/ansible-playbook ~/Documents/proxcli/playbooks/proxmox_destroy.yml --extra-vars="project=$1";}
pcreate() { ~/Documents/proxcli/venv/bin/ansible-playbook ~/Documents/proxcli/playbooks/proxmox_create.yml --extra-vars="project=$1";}
Take care to adapt the path to your proxcli virtual environment installation folder and playbook path.
This way it is easy to call stack creation and destruction.
pcreate grafana-dev-01
pdestroy grafana-dev-01Edit the playbooks/blobal_vars/defaults/main.yml file and add the following to the provision_instances section:
  k3s-dev-01:
    ha_groups:
      master:
      node:
    instances:
      master:
        desc: "control plane"
        count: 3
        ha_group: "master"
        memory: 4096
        cores: 4
        disk_storage: "b4pstorage"
        tags:
          - "k3s"
          - "master"
          - "k3s_cluster"
      node:
        desc: "node"
        count: 4
        ha_group: "node"
        memory: 4096
        cores: 4
        disk_storage: "b4papp"
        tags:
          - "k3s"
          - "node"
- "k3s_cluster" pcreate k3s-dev-01After a few minutes you will have the vm spreaded over your nodes and available.
We will use the following playbook provided on k3s.io github repositories: https://github.com/k3s-io/k3s-ansible
git clone https://github.com/k3s-io/k3s-ansible
cd k3s-ansible
cp -a inventory/sample inventory/k3s-dev-01
proxcli inventory save --filter-name "^k3s-dev-01" --output-format yaml --path ./inventory/k3s-dev-01/inventory.yaml
ansible-playbook -i inventory/k3s-dev-01/inventory.yaml --extra-vars="ansible_user=system" site.yml